
Created October 31, 2010
This page has been created because a few of my regulars have been getting submissions, and haven't been taking a lot of angles that many people like to see, or have not been taking enough pictures of a crossing.
This page will hope to show those people what kind of shots that many of us want to see out of the site.
Passive
crossings...
(Minimum amount of pictures required: 7)
|
|
 |
 |
 |
 |
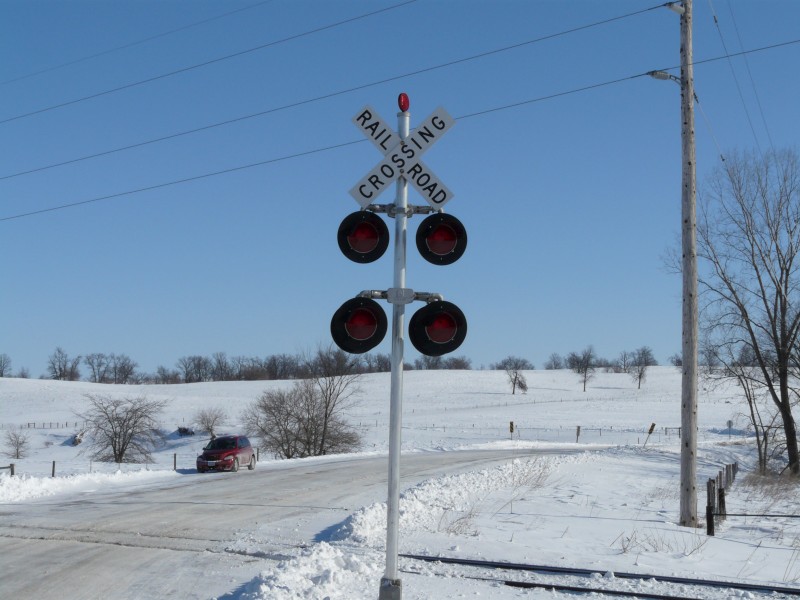
First set: Overview shots. This shows the whole crossing surface in one shot. Note how all signs are shown in one whole picture...
Both sides of the crossing will be required.
|
|
 |
 |
 |
 |
This next set of pictures shows the signs in closeup. All signs in both directions, and if there are more crossbucks than two, will also need to be shown in closeup as well.
|
|
 |
 |
 |
 |
Track views: Both sides of the rail line will be required. Double sets of tracks can be shown in one picture. If there are spurs that cross in a seperate spot than the main crossing, then those tracks will be required too.
Signals: Gateless Mast Setups...
(Minimum amount of pictures required: 15)
|
|
 |
 |
 |
 |
Same as the passive crossings... Overviews of both views will be required. Note how both signals are in the same shot...
|
|
 |
 |
 |
 |
This above set of pictures shows that one signal in a bit of a closeup. Please get both signals (or more if there are more than 2).
|
|
 |
 |
 |
 |
Very few people do this, but very many people
forget to get the rear side of the signal. It's a shame too, because
the rear side of the signal is just as interesting as the front side.
In other words: We want to see what's on the other side of the
crossbuck. Make sure to get the rear lights of both signals (or 4+ if
there are that many), as well as side lights if there are any.
|
|
 |
 |
 |
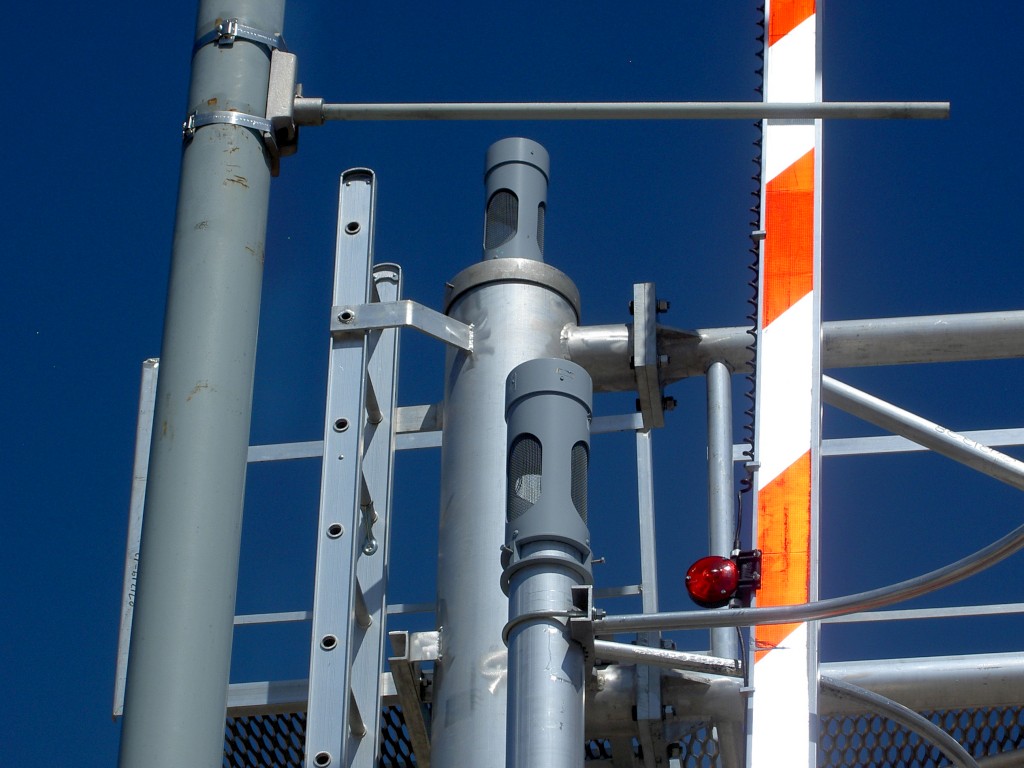
Close ups of the light frames. Many of us want to
know what companies make these lights. This is a very important step
here. DON'T FORGET IT!
Note 1: Some light frames have logos on the side of the frame, instead
of the back. WRRS and Harmon are examples. Make sure to get that logo!
Note 2: If all light frames are by the same company, then just get one logo, and tell me that all frames are from that signal maker. If there are multiple logos, please get at least one shot of all differing logos.
|
|
 |
 |
 |
Close ups of the light frames: Up
until 2000 or so, this wasn't as important, except when the signals
were in action, but as you can see in the last picture: Many signals
now have LEDs in them.
Close ups of the lights, especially the LEDs are required, since there
are so many LED companies in existence. Inactive shots are okay, as
long as you get a good, closeup shot. Active shots are preferred
though, since identifying the LED will be a lot easier.
Do the same for rear lights too.
|
|
 |
 |
 |
Many, many people forget this all important step.
GET THE BELLS! Many people forget this step, and others get only one
bell, and does not get other bells if they exist.
ALL bells need to have pictures taken, especially the backs if
mechanical bells are present. The fronts are optional, but are
appreciated, and are mandatory if the bells are US&S teardrop, as
shown above, since the US&S logo is in the front, and not back.
NOTE: If there are no bells at the crossing, then skip this step.
|
|
 |
 |
 |
Electronic bells don't matter which side you get
them from, especially since many look the same, no matter where you get
them from.
Make especially sure to pay attention to GS and Safetran type 2 e-bells
since they look pretty close from a distance.
Note: Wigwags fall under this same category too. Get close ups of the banner and light, and bells if there are any.
Signals: Gateless Cantilever
Setups...
(Minimum amount of
pictures required: 19)
|
|
 |
 |
 |
 |
Gateless cantilevers work mostly the same way as gateless mast signals, except cantilever lights are required from the front and back (if there are any in back).
 |
Getting the logo of the cantilever is optional if you can find one. Many cantilevers are unique, and can be known from looks alone.
Signals: Gated Mast Setups...
(Minimum amount of
pictures required: 20)
|
|
 |
 |
 |
 |
All views mentioned above in the gateless mast section applies here as well.
|
|
 |
 |
 |
 |
Knowing what company has gate mechanisms is needed as well.
|
|
 |
 |
 |
Gate lights on at least one gate is needed as well,
since gates now have LED lights. Identifying those gate LEDs is a must.
Seeing them lit up when the gate is down is appreciated too.
If gate lights vary on each gate, then each gate must have its gate
lights' picture taken.
NOTE: Getting pictures of gate guards are optional, since many are very hard to tell.
Signals: Gated Cantilever
Setups...
(Minimum amount of
pictures required: 24)
|
|
 |
 |
 |
 |
Combining the steps from the gateless cantilever section and mast gated signal sections above, you should know what to do for gated cantilever setups.
Extra shots to get...
|
|
 |
 |
 |
 |
DOT numbers are MANDATORY for every crossing. They
can mostly be found on signal masts (sometimes gate mechanisms) or
relay cases depending on the railroad.
NOTE: Some light-rail crossings do not have DOT numbers, and are not
required for those crossings.
Try and get what you can. Even if no DOT number is present, some crossings show a BT crossing as shown in the second picture. Clues such as this can help identify a DOT number.
IMPORTANT: If there are no DOT numbers or any clues on the crossing, then take a picture of a nearby street sign to help narrow down a search for a DOT number.
|
|
 |
 |
 |
 |
Some scenery may be important to the crossing. Crossings that have the "NO TRAIN HORN" sign nearby are MANDATORY for picture taking.
Note how in the first 2 pictures, a traffic light helps traffic from stopping on the tracks. Missing shots, such as this may not tell part of the story if they are not obtained by picture.
The last 2 are signs that are unusual, and may be of interest.
This page will be updated as needed.


